|
The autonumbering functionality has been introduced in nVision 13.5. This chapter describes how to add an auto-numbering sequence and how it applies to your system.
Autonumbering is primarily used to facilitate the inventory of assets and documents in the nVision console. Having created several autonumbering sequences, e.g. due to the type of asset, protocol or license, we can easily and transparently track the progress and changes in our organization.
Adding an auto-numbering sequence
To add an autonumbering sequence:
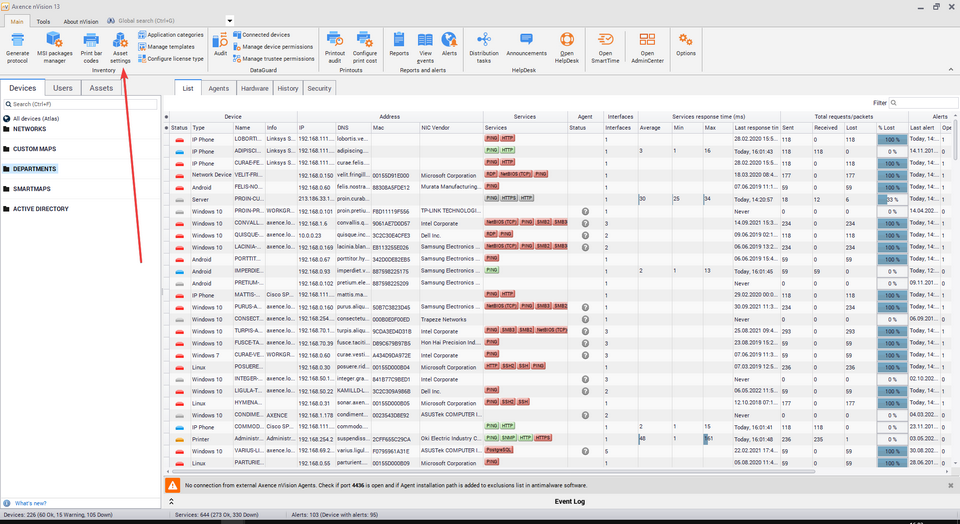
1. In the main nVision console window, click on the Main tab, and then on Asset settings.
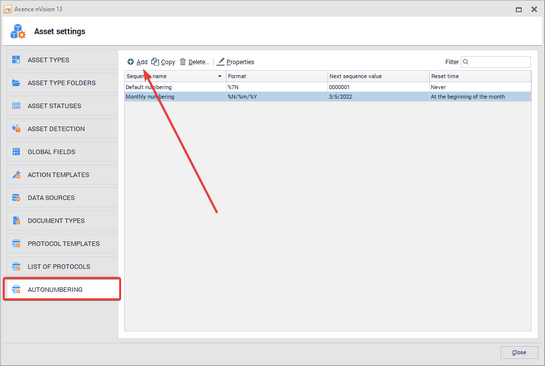
2. Click on the AutoNumber tab.
3. Click on Add button.


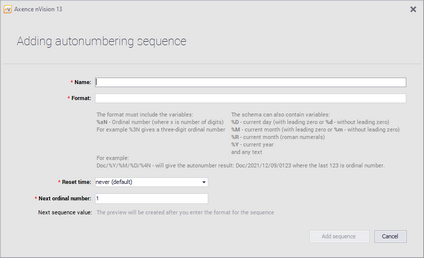
In the window for adding autonumbering sequences, certain parameters have to be configured. First of all, establish a unique name for the AutoNumber sequence (there cannot be two sequences with the same name in your system), and then proceed to creating the AutoNumber Sequence format.

The auto-number sequence format consists of several elements. The format must contain the %xN variable - where x is the number of digits, e.g. if we enter %5N, the sequence number will consist of five digits. The format may also contain other optional elements:
•%D - current day, with a zero in front, %d - without a zero in front •%M - current month, with a zero in front, %m - without a zero in front •%R - current month (written in Roman characters) •%Y - current year •any text, e.g. a hint as to what type of an asset is autonumbered An example of an autonumbering sequence: Printer %4N %D %M %Y, that will translate into Printer 0241 05 07 2022.
Additionally, you can set whether the sequence is to be reset, so its value will be reduced to 1. Available reset options:
•never (default) •at the beginning of the month •at the beginning of the year
The auto-numbering sequence can be edited (after selecting a specific sequence and clicking on the Properties button), deleted (after selecting and clicking on the Delete button, or copied (after selecting and clicking on the Copy button).
There is no autonumbering sequence limit in nVision, therefore, depending on the needs, size of the organization, types of supported assets, licenses or documents, the administrator can create an appropriate number of unique auto-numbering sequences.
 Assign an autonumbering sequence to an asset type Assign an autonumbering sequence to an asset type
|
|
|
|
1. In the main nVision console window, click on the Main tab, and then on Asset settings. By default, the Asset Types tab is displayed, this is where we assign the autonumbering sequence.
|
2. If no asset type exists in the system, you must add it first
|
3. When you have an asset type ready, you need to select it - by clicking on it in the table, and then clicking the Properties button (the autonumbering sequence can also be assigned when adding a new resource type).
|
4. Click on the Inventory number field, and then select Automatically from sequence from the pull-out list.
|
5. After completing the above step, a previously unavailable field will be displayed below the Inventory number field. Click on them, and then from the list select the sequence that you want to assign to the given type of asset.
|
6. To confirm the changes made, click the OK button.
|
From now on, the selected autonumbering sequence will apply to the selected asset type. The same autonumbering sequence can be used for many different types of protocol, assets or licenses, but as it can create unnecessary confusion, it is recommended to create separate, unique autonumbering sequences for different types of objects (even if the only difference between the sequences will be on their unique name).
|
 Assign an autonumbering sequence to a protocol template Assign an autonumbering sequence to a protocol template
|
|
|
|
1. In the main nVision console window, click on the Main tab, and then on Asset settings.
|
2. Click on the Protocol templates tab..
|
3. Click on the protocol displayed on the list, and then click on the Properties button (the autonumbering sequence can also be assigned when adding a new protocol template)
|
4. Click the Protocol number field, and then select Automatically from sequence from the drop-down list.
|
5. After completing the above step, a previously unavailable field will be displayed below the Protocol number field. Click on them, and then from the list select the sequence that you want to assign to the given type of an asset.
|
6. To confirm the changes made, click the OK button.
|
From now on, the selected autonumbering sequence will apply to the selected asset type. The same autonumbering sequence can be used for many different types of protocol, assets or licenses, but as it can create unnecessary confusion, it is recommended to create separate, unique autonumbering sequences for different types of objects (even if the only difference between the sequences will be on their unique name).
|
 Assign an autonumbering sequence to a license Assign an autonumbering sequence to a license
You can assign an autonumbering sequence to a license in two ways. First of all, it can be done already at the stage of configuring a new license type. For this you should:
|
1. In the main nVision console window, click on the Main tab and then on Configure license type.
|
2. Click the Inventory number field, and then select Automatically from sequence from the pull-out list.
|
3. After completing the above step, a previously unavailable field will be displayed below the Inventory number field. Click on them, and then from the list select the sequence that you want to assign to the given license type.
|
4. The next step is to correctly fill in the remaining fields of the form, and then click the Ok button.
|
From now on, the selected autonumbering sequence will apply to the selected asset type. The same autonumbering sequence can be used for many different types of protocol, assets or licenses, but as it can create unnecessary confusion, it is recommended to create separate, unique autonumbering sequences for different types of objects (even if the only difference between the sequences will be on their unique name).
|
|
The auto-numbering sequence can also be assigned to a license type that already exists in the system. To do this::
|
1. In the main nVision console window, click on the Main tab, and then on Assets.
|
2. Then find the Software folder and click Licenses.
|
3. The list on the right will display all the licenses saved in the nVision system. To view the properties of a selected license, double-click it or select the appropriate license and click the Properties button.
|
4. In the license information window, click on the Inventory number field, and then select Automatically from sequence from the pull-out list.
|
5. After completing the above step, a previously unavailable field will be displayed below the Inventory number field. Click on them, and then from the list select the sequence that you want to assign to the given license type.
|
From now on, the selected autonumbering sequence will apply to the selected asset type. The same autonumbering sequence can be used for many different types of protocol, assets or licenses, but as it can create unnecessary confusion, it is recommended to create separate, unique autonumbering sequences for different types of objects (even if the only difference between the sequences will be on their unique name).
|
|


