|
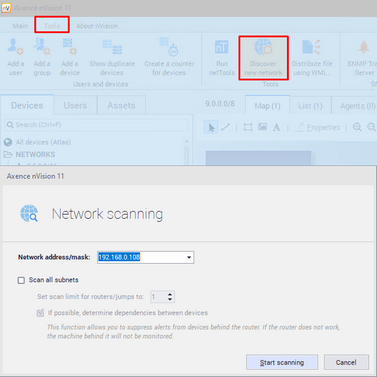
The network discovery wizard helps you to define all options required to properly scan a new network. This wizard opens when you want to add a new network or when you are creating a new Atlas.
New network scan options
They allow you to define which network will be scanned and how.
Property
|
Description
|
Address
|
Enter the IP/DNS address of the host located in the network you want to scan. The program automatically enters the local address, which you can leave unchanged if you want to scan your local network.
|
Mask
|
The network mask. In most cases you need not to change this field which defaults to “255.255.255.0”. If changed it can result in a very long discovery time.
|
Scan all subnets
|
Check if you have a router in your network and also want to scan neighboring networks behind this router.
nVision can scan not only the network you entered, but it can also go “through” routers in this network and scan all connected networks. This function works if the router is SNMP manageable and you will provide (or already provided) the SNMP community. The program will read the routing table from the router and try to scan all networks connected to this router.
|
Set scan limit for routers/jumps to
|
Allows you to limit the number or hops (routers) while scanning.
|
If possible, determine dependencies between devices
|
This feature allows for the limiting of the alerts from devices behind the router. If the router is inactive, the devices behind it will not be monitored.
|

Click Scan. This will start the discovery process. You will be able to see the discovery progress. You can stop the network discovery anytime. If you stop it before it finishes scanning the network, you will still be able to add the networks and hosts discovered so far.
When the discovery process is finished, you will see a message specifying the number of hosts/networks discovered. Click the OK button to close the scanner window and add all discovered hosts and networks to the Atlas.
| 


